Monday, July 30, 2012

Inspiration!

I seriously have been a crafting DIVA since our crafting weekend a few weeks ago.  I immediately set up my sewing machine and have found myself behind her sewing a multitude of things.  A nubby pillowcase for my son in a fabric HE chose and "had to have".  More of those adorable circle skirts!  {I think just about every little girl on my Christmas list will be getting one this year.}  And just playing around with some random ideas.  One afternoon I whipped up a small quilted table runner to try and use up some of my scraps.

Today we had some extra time after swimming lessons and so we buzzed through a few thrift stores in search of treasures.  I wanted to pick up some tee's for some ideas I had in my head, and found 3 in gorgeous shades to make 3 different projects.    And at least these projects didn't get added to the "to finish someday" pile!

TURQUOISE

I think turquoise is my new favorite summer color.  And while this shade isn't a true representation of the actual color I {love}, it'll do.  So I made another dolman tee out of it!


SHERBERT

Another color I can't resist.  I had thought that this would be a skirt for myself, but alas, my hips are still to big.  {sad face}  However, it fits my daughter perfectly.  The ruffle was already on the bottom of the shirt, so I simply cut off the top to the correct length I wanted the skirt, and added the elastic waistband just like in the circle skirts.  {i love working with jersey knit}


LIME

Could there be 3 better colors to work with ??  I think not!  This one was just meant to be an infinity scarf.  1 Pinterest Tutorial + 1-$1 Tee = a funky infinity scarf that's NO SEW!


And then something with the scraps {love} - A little wrap for a mason jar to hold my scissors, etc.


More to come as I think I've found the armoire that will work perfectly for my craft organizer!


Tuesday, July 24, 2012

Another week DOWN

Even after a girls crafting weekend where there were turtle muffins {yes, there are such things, and we have fallen in love with each other} and other goodies, I managed to squeak out a loss of 1# this past week.  I'm thrilled, and now back down to what I weighed at the start of summer.  I didn't gain a lot, but I was up about 2#'s overall, otherwise maintaining over these summer months.  Well, now I'm itching to loose these last 15-ish pounds and be at goal!

Two of my kiddos also had their check ups today and their pediatrician encouraged me to get rid of the junk food {hot dogs, chips, white bread} and serve the family what I've been eating.  He encouraged me to take baby steps towards a changing lifestyle. 

Our first change - BREAKFAST!  No more toast toast toast for breakfast.  My kids could easily put away a small loaf between the 3 of them for breakfast!  Starting tomorrow, I will get up a few minutes early and make eggs, oatmeal, pancakes... something other than several pieces of toast.... as their breakfast meal. 

What'll we change next?  I don't know, but this seemed like the most obvious step!  I'll keep you posted on our transitions and how the fam is taking the change. 

What healthy changes have you made recently?

Girls Crafting Weekend Recap

As promised, a recap of the girls crafting weekend.  

It all started with an innocent comment on facebook that flourished into oblivion.  And by 'oblivion' I mean a full blown weekend of girl time and crafting!  Think mirror tiles, fabric galore, yarn, beads, hot glue guns, paint and brushes, tutorials accessed via laptops, tracing paper, tissue paper and quilts!  Every available crafting surface was utilized to it's fullest.  Here's how it went down...

I found this great tutorial on how to convert a man's t-shirt like this....
 ......into a ladies dolman t-shirt like this!  It seriously took like 10 minutes!
Here we are all spread out on the brand spankin' new Amish made table.
 Grandma helping make poms to decorate a future nursery.  
{NOT mine, mind you}
 My sister and I making garden bling with fishing line, beads and mirror tiles.
 My garden bling complete.  I love how it turned out with the sparkle and turquoise.
 My other sister crafting away with beads!
 Here she is again with the earrings and necklace she made.  I am SO stealing the necklace idea.  Tutorial to come!!
  Thank you Mom for bringing your fancy shmancy sewing machine. 
 Working on my circle skirts.

 Here I am, back at home, posing in my skirt.
  My little stinker of a nephew.  Nana didn't get much done this past weekend with all your finicky naps.
One of my daughters with the box she painted.

 And my middle sister, once again, with her knit sock - that's she's been working on for almost a year!

It was a wonderful time of getting to know each other and sharing ideas.  Another is already in the works for over the winter months when we're all itching for some inspiration!

Tuesday, July 17, 2012

You've all seen those cartoons where a character finds themselves out on the ice in the middle of a pond.  Or on a kitchen floor covered in marbles.  Legs go in every direction.  They slip.  Regain composure.  Start sliding again.  Steady themselves.  Their legs move rapidly as they try not to fall completely down.  Sometimes they make it through the ordeal unscathed.  Other times they end up on their rump and must carefully find their footing again.

This.  Is me.

It's obvious I haven't been posting about my weight loss, and the above described scenario is why.  There's been really nothing to report.  No milestones to write home about.  I gain a little, I loose that little.  The scale goes up a bit.  The scale goes down a bit.  As of tonight, I'm about 1# up from my absolute lowest.  I'm not freaking out about it.  I'm not even upset.  It is what it is and I will continue to maintain my current weight until I find the motivation to continue loosing that last 13# I want to loose.

A week ago at my Weight Watchers meeting, we talked about slip-ups.  That's what got me thinking about this blog post.  I knew I had to blog to keep myself accountable, but my "all or nothing" mentality was telling me it wasn't  worth blogging about.  

Well, no more all or nothing.  It's my goal to start blogging regularly again to share my struggles and triumphs with all of you.  Right now there are more struggles than triumphs, but I'm trying to look at them as learning opportunities.  

So, look your struggle square in the eye and tell it that it doesn't have power over you!  Take this moment.  This very moment and do something to change your struggle into a victory!

Here's to hoping to report a triumph next week!
Michelle

No "this is me this week" photo, but I will share this doosey from our 80's themed summer party this past weekend.  What a hoot!


Sunday, July 15, 2012

Guest Blogger - Camo Cupcake Tutorial

I'm always on the lookout for fun new recipes.  And what better way to add some shizam to a birthday bash than with a fun dessert for the kiddos!  That's why when I saw a friend on Facebook post a picture of her camouflage cupcakes from her son's birthday, I instantly asked if she'd be a guest blogger to tell us ALL how she did it!  Turns out, it's super simple.  But we can keep that secret to ourselves, ok?

So without further ado, courtesy of my friend Kelsey, the awesomest camo-cupcake tutorial EV-er.  Thank you for sharing this tutorial with us, Kelsey!!  


The cupcakes are unbelievably easy, just a little time consuming!

Ingredients:

1 Classic White cake mix

2 Classic White frosting containers

Food dye GEL- Black, Green, and Brown 
(I used a concentrated frosting gel because that's all I could find and it still worked great)

White cupcake liners


Mix up the cake mix as directed by the box then divide into 4. Dye one green, one black, one brown, and the last one use only one small drop of brown to make a beige color.


Now comes the time consuming part...drop small amounts of each batter color into the liners,


 switching between all 4 to create the camo look. 


Fill 2/3 full just as you would any other cupcake. Then just bake as directed on the box!

Enjoy!

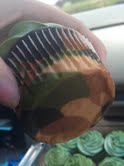
Here's what they look like when they come out of the oven!
You can even see the camo pattern through the liner.
Don't they look tasty?  Delicious AND cute.... I mean cool!  {Boys don't appreciate cute things.}
And of course her cutie-patootie son, Nolan, enjoying one!


Sunday, July 8, 2012

Farm Fresh


Do you watch American Pickers?  I {heart} that show!  After I watch an episode I'm all geared up to approach a random farmer and ask to pillage his barn! Especially after I got a fabulous idea on pinterest.  For those of you who have been in a cave, pinterest is seriously the ultimate website for organizing your craft ideas, home decor ideas, recipe ideas, fashion ideas... you get the idea.  I {heart} that website, too.

Anyway, after seeing the idea for using a door for a garden gate, I knew I had to do this.  But, like many projects, the time from conception to fruition is horribly long.  I scoured craigslist, the Habitat Re-Store, rummage sales, and curb sides looking for a door that would work.  I found a pair of lovely french doors to use - heavy beasts but gorgeous - but upon getting them home was told that they would not work.   So I kept looking when my fabulous friend Lana heard of my predicament and came to my aide.  She let me pick her BARN!

So, last weekend while we were there for a summer party, we stole away and climbed over chicken wire and raspberry bramble to get inside.  {you know those moments where a light shines down from heaven and you hear a choir singing}  You get the picture.  She had doors upon doors upon doors and we flipped through them for quite some time until we found the perfect ones.


A Saturday afternoon of hosing them off, busting the glass out and removing rusty hinges and we were ready to hang them.  The first one went up and I thought I was going to pee my pants I was so in love with it!  Then my wonderful husband got the other one up and I was more in love... but it needed something.  So I picked my own garden stash in the garage and found these iron shelf brackets that we've been storing for the last 5 years and they made the perfect addition to the bracing at the top.

One last final touch.  I wanted to make it personal.  Ever since I was little, I was called "beans" or "Shelly Beans".  Apparently there was a doll named Shelly Beans and voila.  I became Shelly Beans.   So I decided to add a touch of paint to say "beans' Garden" to welcome you as you enter the garden.

I think what I love love love about my garden and gate is that it reminds me of my childhood.  Finding spaces between trees that became doorways to houses.  Tufts of grass that became "pom pom world".  Uprooted trees that became caves and tunnels.  That sense of whimsy and pretend are alive as you step foot through the doors and into my garden paradise.  Hopefully the weeding fairies will find my garden now and bless me with fewer weeds!


I'm so freakin' in love with my new garden gate you may just find me sitting out there staring at it.