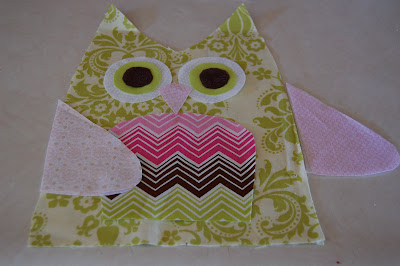
I told you I'd get one out there, and here you go! It's my first stab at a how-to, but if you find yourself wanting to tackle some new projects this winter, this could be one for you. I'd have to say it's probably an INTERMEDIATE sewing level, but totally do-able if you're still learning your way around your machine. Let me know if you try it and post pics!
Owls are all the rage these days so it was a no-brainer that I create these cuties for my "neice" Stella. {I put neice in quotes because she's my cousin's daughter, but I feel more like another Aunty!}
First find some fabulous fabric for the different parts of your owls. I chose 6 different fabrics. {body, wings {mine were double sided}, chest, 3 layers of eyes & beak} I absolutely LOVE the zig-zag fabric I scored that mimic the chest feathers!Some of the fabrics can be used twice, like I used some of the wing fabric for the beak shape. You could do the same for the eyes as well.

The other supplies you'll need:
-sewing machine and thread
-fusible web
-embroidery floss {you pick the color!}
-stuffing
-pins
-camera {so you can send me a pic of your creation}
I had seen the idea on Pinterest, so I had to create my own templates for the different shapes. I used cereal box cardboard. Easy to cut yet sturdy enough. You'll need one body shape, the chest shape. The wing shape. 3 circles for the eyes and a beak {diamond} shape.

Next start tracing and cutting out your fabrics using the templates. Remember to cut 4 wing shapes out and 2 body shapes. And 2 of each eye circle shape.

Using fusible web, applique the owl's features onto one side of the body. Iron each layer separately, working from the body outward.

Use embroidery floss to add details around the eyes and body. A simple straight stitch or blanket stitch look nice.

Next you'll want to sew the wings. Place right sides together and stitch around the curve, leaving the flat surface open to stuff. After you've sewn it, notch out around the bend of the wing to create less bulk. Turn it right side out, do an embroidery detail and stuff lightly. {An alternative to this step would be to use a stiffer felt and NOT sew. Still super cute!}


Once you have the wings sewn and stuffed, the tricky part comes. *wink* Pin the wings like the photo shows - facing inward on the right side of the owl's body. Just tack each one with 1 or 2 pins.

After that, place the other owl body shape on top of the part you just pinned with right sides facing together. {essentially sandwiching the wings between the two body shapes}

Pin around the entire owl body leaving the bottom open for stuffing.


Now you're ready to sew! Go slowly and pull pins as you go. Stitch straight across at the ear tips instead of a "V" shape. Again, less bulk when inverting. Trim the excess fabric from the tips of the ears as shown.

Once you've sewn around the owl, turn it right side out, using an eraser end of a pencil to push the pointy parts of the ears out. Then stuff the dickens out of it. I made mine good and plump. Use the eraser end of the pencil to get in all the nooks and crannies too.
Now the bottom! Because I made this pattern myself, I had to work on the bottom through trial and error. {and ooh boy were there the errors!} I knew I wanted a more rectangular bottom, so I cut a rectangle of fabric and sewed it on with my machine. Then with lots of time and patience, I hand stitched the rest in place once it was completely stuffed. An alternate bottom could be to just sew straight across the bottom. Be sure when hand sewing that you turn the edges inwards so that you do not have raw edges facing out.


Squeeze and primp till it looks the way you want it to. You can also weight the owl if you want it to sit up nicer.
Here they are all boxed up for her birthday!

Let me know how I did writing this tutorial. Was it easy to follow? Too wordy? Not enough pictures or directions?
Enjoy!
1 comment:
That is awesome! And very timely. One of our family members is having a baby next month and her theme is owls. Thanks!!!
(And just wordy enough with great pics and details.)
Post a Comment